Image-guided lumbar puncture
One of the most common procedures in neuroradiology is the lumbar puncture. There are a number of indications for lumbar puncture in both inpatients and outpatients (see panel). While many patients can have lumbar puncture without image guidance, there are a variety of reasons for performing the puncture with image guidance. These include factors which may make landmark guided lumbar puncture difficult, including large body habitus, history of prior spinal surgery, or advanced degenerative changes.
While lumbar puncture can be performed with guidance via fluoroscopy, CT, or MRI, by far the most common source of image guidance is fluoroscopy. This is due to its relatively low radiation dose, low cost, and ease of use. CT and MRI tend to be reserved for more advanced cases. Prior to spinal puncture, the patient’s prior imaging (radiographs, CT, or MRI) should be reviewed along with relevant lab values (particularly coagulation values).
The most common indications for lumbar puncture are:
- Diagnosis
- CSF analysis (meningitis, malignancy)
- CSF pressure (pseudotumor, CSF leak)
- Improvement after puncture (pseudotumor, ‘normal pressure hydrocephalus’)
- Imaging
- Myelography
- Cisternography Lumbar drain placement
- Intrathecal chemotherapy
The fluoroscopic approach
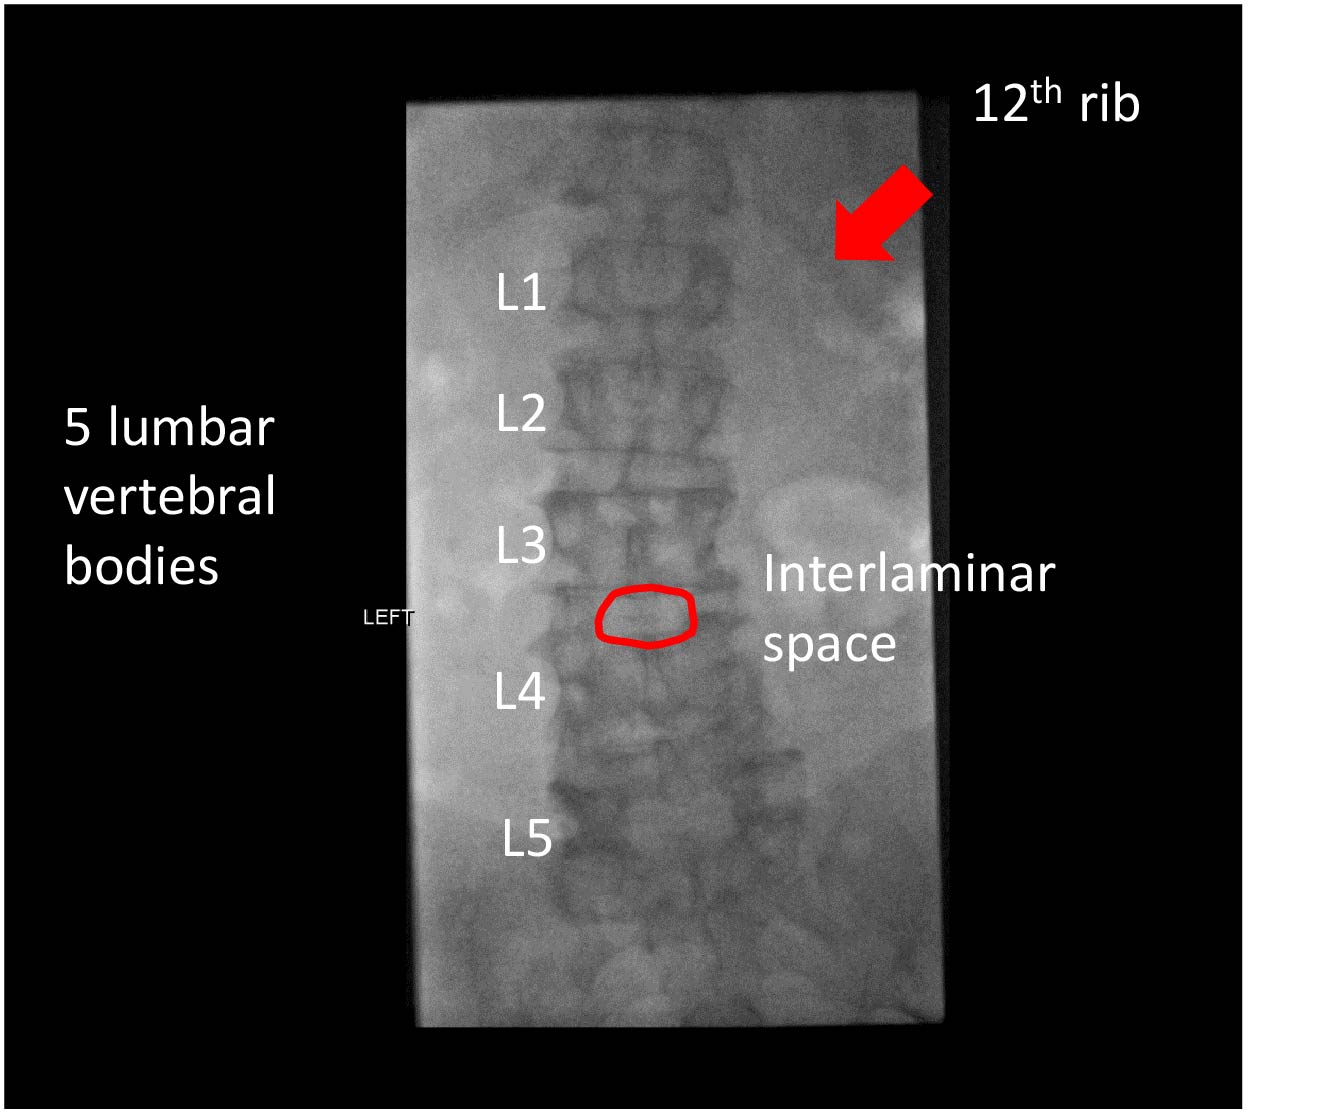
The first step in the fluoroscopic lumbar puncture is positioning the patient on the table. The optimal position is with the patient prone in a slight lateral decubitus. This can be achieved by having the patient lie on his/her stomach, turning the head away from the operator, and bringing the knee away from the operator toward the chest. This results in about a 10-20 degree tilt, moving the spinous process out of the approach. Survey images can be obtained, and should be used to properly number the vertebral bodies and choose a suitable site for the lumbar puncture. The ideal site to puncture is at L2-L3 or below, although in many cases it is safe to perform the procedure at L1-L2. Counting ribs may be necessary to determine proper numbering, particularly in cases when patients have transitional anatomy.
After locating the interlaminar space, a suitable target trajectory can be chosen and marked with hemostats or a needle on the fluoroscopic image. The site should then be marked with a marker and the skin cleaned with betadine. Local anesthesia can be achieved by making a skin wheal with 1% or 2% lidocaine followed by deeper anesthesia with a thin needle. Once adequate time has passed to allow anesthesia to take effect, the puncture may begin.
There are multiple needle factors to consider, including gauge (20, 22, and 25 Ga), length (9-17 cm), and tip type (sharp/beveled vs. atraumatic). The most common needle included in the puncture kit is a 20 Ga 9 cm Quincke (beveled) tip. Using a smaller caliber needle, such as a 22 Ga, can lower the risk of post puncture headache and subsequent CSF leak. However, thinner needles without beveled tips are more difficult to use. A good general purpose needle is the 22 Ga 9 cm Quincke, with longer needles for larger patients.
Approaching the thecal sac
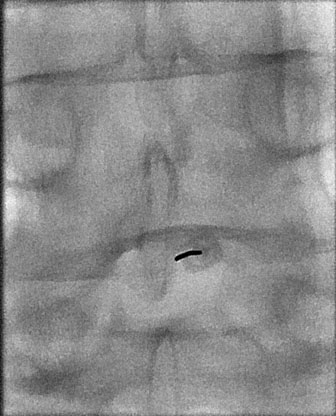
Once the patient is appropriately positioned and anesthetized, the procedure itself can begin. The first step is to insert the needle into the skin and subcutaneous needle several centimeters, attempting to get the needle perfectly perpendicular to the fluoroscopy table. This results in an end on view of the needle under fluoroscopy in which the goal is to make the needle look like a single point. Under intermittent fluoroscopic guidance, the needle is gradually advanced until a change in resistance signifies passing into the ligamentum flavum.
Once the ligamentum flavum is reached, typically only 5-10 mm of additional advancement is needed to reach the thecal sac. With experience, feel becomes a significant component in the lumbar puncture and less frequent imaging may be necessary.
After the ligamentum flavum has been passed, the stylet can be intermittently removed to check for flow of CSF. If no CSF is obtained, the stylet is replaced and the needle advanced in 1-2 mm increments and rechecked for CSF flow. CSF flow may be improved by asking the patient to cough or valsalva, which increases CSF return and may make the flow of CSF more visible in the needle hub.
Once CSF flow is obtained, CSF collection can be performed by attaching tubing and collecting CSF in the plastic tubes in the kit. It may be necessary to augment CSF flow by tilting the table in reverse Trendelenberg (head up) to increase the flow of CSF. If CSF pressure measurements are desired, they can be made before and/or after collection of CSF. Once the desired procedures are completed, the stylet should be replaced prior to removing the needle.
Troubleshooting
CSF flow is not always easily obtained for a variety of reasons. The two most common, however, are needle positioning and relatively low CSF pressure.
The most common cause for no CSF return is that the needle is not in the thecal sac. Because fluoroscopy is being used in a single plane, the most common error is an inappropriate depth (too shallow or too deep). If the needle is just beyond the ligamentum flavum, it is possible that the dural is tented around the needle and advancing in just further in a quick maneuver can puncture the thecal sac. If slow venous blood is obtained, the needle is likely too far in and in the ventral epidural venous plexus.
If subtle movements and checking for flow of CSF are not adequate, lateralimaging can be performed. This can be done either by rotating the camera (if using a C-arm), taking a lateral radiography, or simply carefully rotating the patient. This can demonstrate the depth and location of the needle. If needle positioning is confirmed. CSF pressure may be quite low, and may require further elevation of the patient’s head.

Lumbar puncture video
If you’d like to learn more about lumbar punctures and see a video on this topic, check out the following video.
More videos are covered in the full playlist.
Summary
With the vast majority of patients, fluoroscopic guidance leads to fast and relatively low risk spinal puncture. In very complex situations, it may be necessary to perform cervical puncture or CT-guided puncture, but these cases are rare.
In summary, image guided LP is appreciated by patients, who frequently have already had one or more unsuccessful attempts at puncture. This makes it rewarding for both patient and provider, and is a vital service for the hospital system.